The Ultimate Guide to Home Theater Setup
Achieving great sound in a home entertainment system is inherently more complex than with stereo systems, because there are six to 12 speakers to set up, rather than just two. No matter what speaker configuration you choose, this guide to home theater surround sound setup will help you place and configure your speakers for the best possible sound.

By Fluance Audio
Table of Contents
Speaker Types
Numerous types of speakers exist, with defining characteristics that including the speaker’s enclosure, size, mounting options and the frequency response they produce. These types aren’t mutually exclusive, so a particular speaker may belong to more than one category. Speaker types include the following:
- Floorstanding
- Center Channel
- Bookshelf
- Surround
- Dipole
- Bipole
- Subwoofer
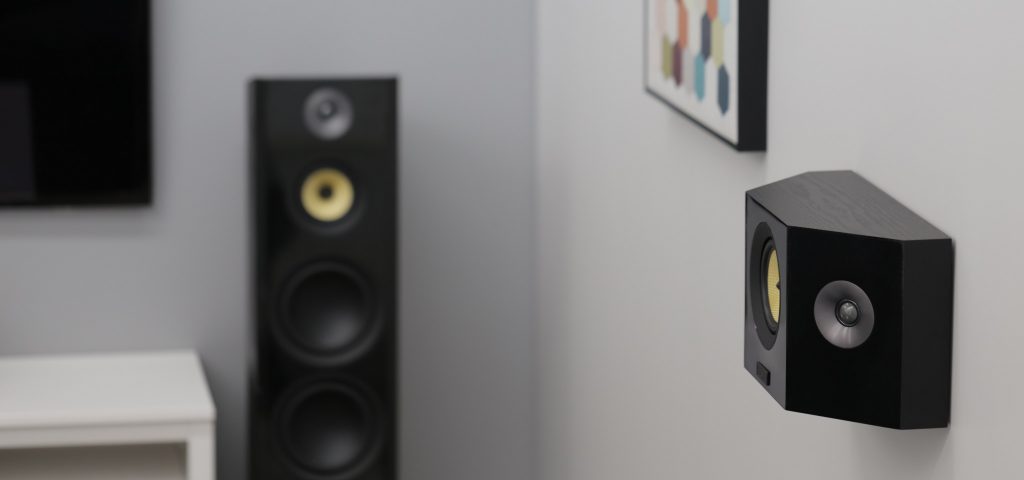
Floorstanding
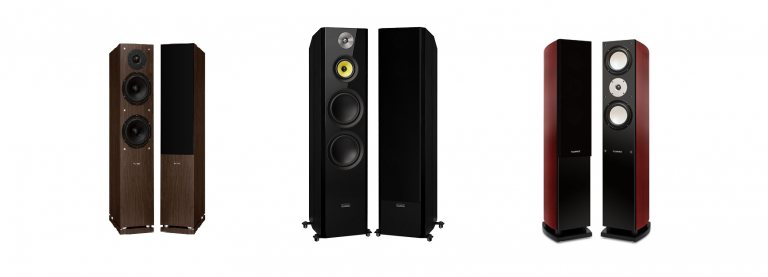
Floorstanding speakers sit directly on the floor without a separate stand. They’re often called tower speakers because the enclosures are typically tall and narrow.
Floorstanding speakers usually contain multiple drivers such as dedicated woofers, tweeters and midrange drivers.
The large enclosure of floorstanding speakers usually allows them to produce more bass than other speakers.
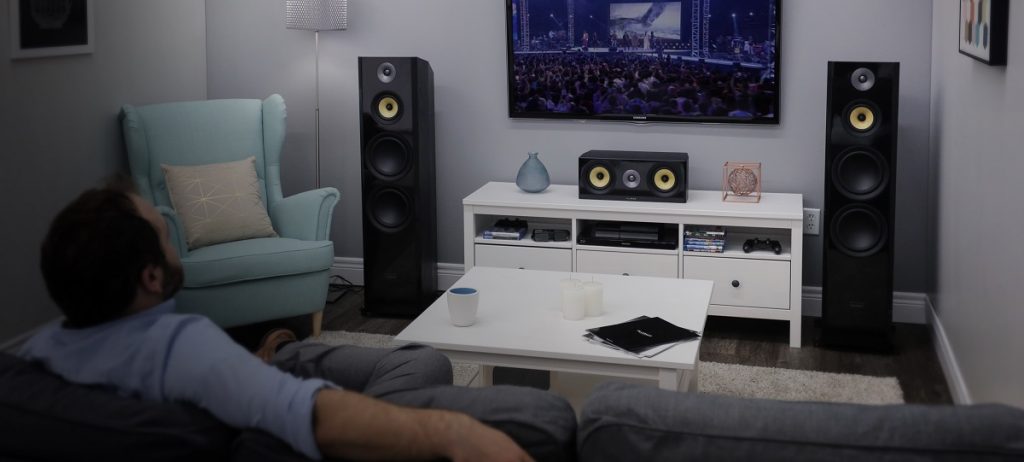
Center Channel
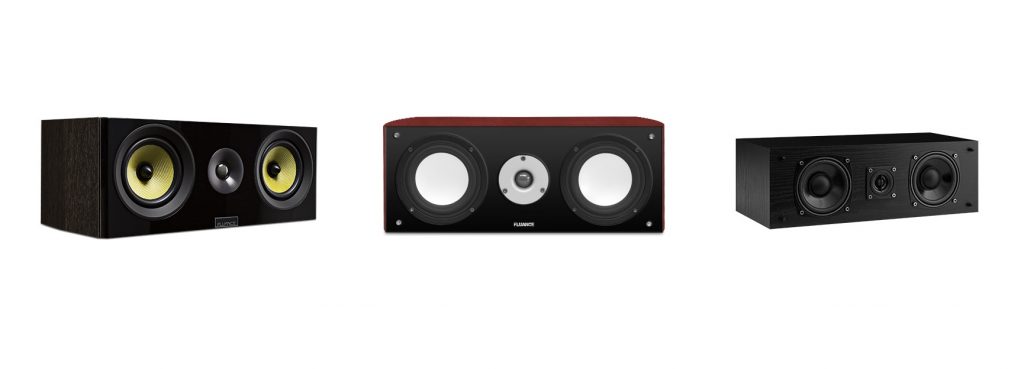
A center channel speaker sits directly below or above the screen/television. The majority of dialogue or principal vocals come from the center channel making it a critical component in a home theater setup.
One of the biggest advantages of a separate center channel speaker is isolating the voices from the rest of the audio so you can compensate if the soundtrack or sound effects are too loud.
Placement can be trickier if you have multiple rows of seating in your home theater as seats and people can obstruct the sound coming from the speaker. Depending on the height of your speaker stands or where it is mounted you can utilize angled foam to tilt the speaker in a more optimal direction aimed directly at the listeners ears.
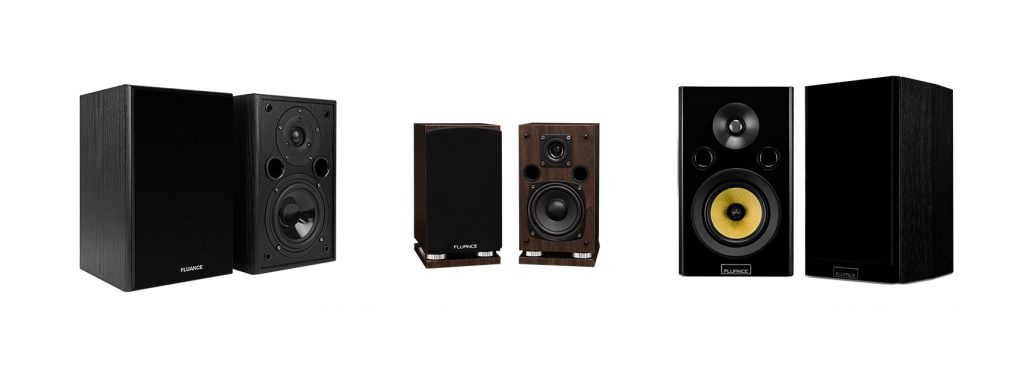
Bookshelf
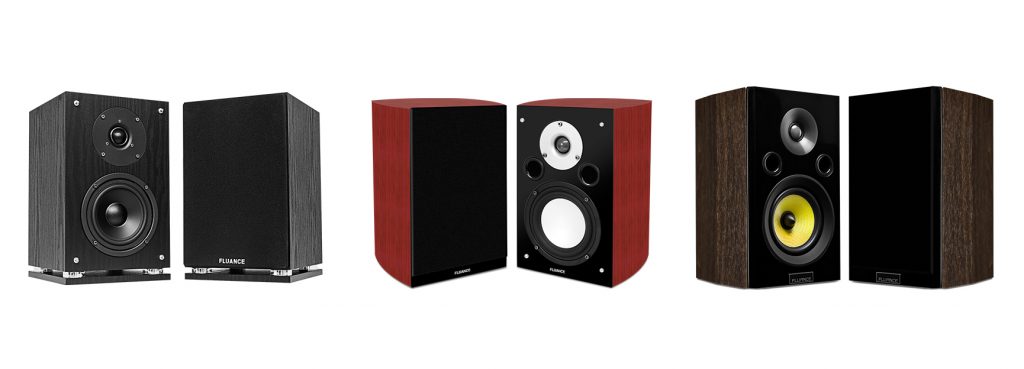
A bookshelf speaker almost always has a smaller enclosure than a floorstanding speaker.
These speakers usually contain a woofer and tweeter, although some models may also include a midrange driver. The smaller enclosure of bookshelf speakers limits their bass output.
Surround
A surround sound recording adds sounds behind and to the sides of the listener. This sound is played on surround speakers, which can be either conventional speakers placed behind the listener, or speakers built specifically for use in the surround channels.
Dipole
A dipole speaker is one that radiates sound waves in opposite directions, with the front and back waves 180 degrees out of phase. This can be a box speaker with drivers on the front and back, or it can be a speaker with an open back—either a panel (electrostatic or planar magnetic) speaker or one using conventional woofer, midrange and tweeter drivers.
The process of firing drivers in opposite phases cancels out sound in the area to the side of the speaker. Usually the speaker’s two sound waves are out of phase only above a certain frequency, so that the speaker’s bass waves don’t cancel each other out.
Dipole speakers are often used for the front left and right channels in a stereo or surround sound system. They also work well as surround speakers, with the drivers pointing forward and backward, and the listener sitting to the side of the speaker.
In this configuration, the listener hears almost no sound directly from the speaker, only sound reflected from the walls, ceiling and floor, which makes the sound more spacious.
Usually, dipole surround speakers are mounted directly on the side walls of the home theater.
Bipole
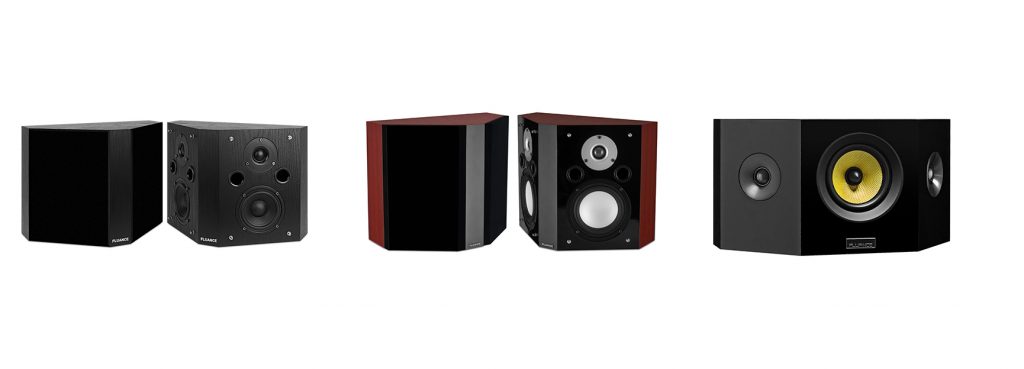
The drivers in bipole speakers are arranged in pairs facing different directions, just as they are with dipole speakers. However, all the drivers in a bipole speaker are in phase with each other, meaning the sound waves add up rather than canceling each other out.
The area between the two halves of the bipole speaker still has a diffuse sound, although it’s nothing like the dramatic null area of a dipole speaker.
Bipole speakers are often used in the front left and right channels of a stereo or home theater system, with one set of drivers pointing at the listener, and the other set pointed toward the wall behind the speaker.
Their spacious sound also makes bipole speakers useful as surround speakers, with one set of drivers pointing toward the front of the room and the other pointing rearward.
Bipole surround speakers are often attached directly to a wall.
Subwoofer
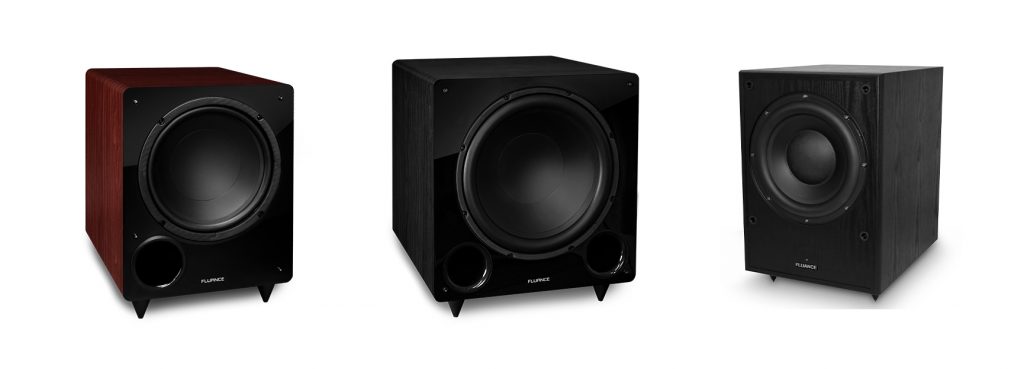
A subwoofer reproduces very low frequencies that are below what a typical woofer can handle. The cut-off frequency for a subwoofer is typically about 80 Hz, although it might be lower if the main speakers are large, or higher if the main speakers are small.
A subwoofer’s design is usually simpler than that of other speakers. Because the subwoofer’s frequency range is so narrow, most have just a single driver in an enclosure. The long wavelengths of the deep bass tone the subwoofer produces emanate equally in all directions, so the driver doesn’t need to face the listener. In fact, some subwoofers have downward-facing drivers.
Speaker Specifications
Many characteristics affect the sound that a speaker produces, especially in a surround sound system where large numbers of speakers work together.
The most important speaker specifications include the following:
Configuration
A speaker’s configuration refers to the number and type of drivers the speaker has. Drivers are generally classified according to the frequency range of sounds they reproduce, such that woofers play low frequencies, tweeters play high frequencies and midrange drivers play frequencies between these two extremes.
The most common configurations in modern speakers are 2-way and 3-way configurations, which indicate the number of drivers the speaker has.
A 2-way speaker has a woofer and tweeter, whereas a 3-way speaker has a woofer, tweeter and midrange driver. A subwoofer typically only has one driver.
The reason that speakers have multiple drivers is that drivers perform optimally only within a certain range of frequencies. For example, low frequencies require the driver to move a lot of air slowly, so the driver needs to be larger. However, high frequencies require the driver to move small quantities of air quickly, which requires a small driver. The size of a midrange driver is therefore between that of a woofer and tweeter.
It’s natural to assume that a 3-way speaker is better than a 2-way speaker because it has an extra driver, but the truth is more complex. A 2-way speaker only requires a single crossover frequency. Sounds above this frequency are sent to the tweeter, while sounds below this frequency are sent to the woofer.
In a 3-way speaker, the designer must use two different crossover frequencies, one between the woofer and midrange, and another between the midrange and tweeter. This means the crossover must have about twice as many parts, which adds cost. The extra driver, the separate enclosure for the midrange driver, and the larger overall enclosure also add to the cost. Thus, to get the potentially better fidelity of a 3-way speaker, the designer may have to cut costs by using thinner cabinet materials, lower-quality drivers, etc. So sometimes a 2-way speaker might sound better than a 3-way speaker in the same price range.
Power Handling
Speakers are usually rated for the maximum power they can handle, and sometimes for the minimum power they need. Many buyers put too much stock in these ratings. The truth is, most speakers have enough power handling to play loud enough for most home environments, and most are sensitive enough that even an amplifier with less than the specified power will work fine.
Speakers sometimes have two ratings that indicate the amount of power the drivers can handle without damage, as measured in watts. The Root Mean Square (RMS) rating, so named for its method of calculation, indicates continual power output of the amplifier connected to the speaker. The peak power, or max, rating is the maximum power the drivers can handle as an instantaneous burst.
The primary factor that determines these power ratings is the physical construction of the driver. However, neither of these figures is related to the power the drivers need to reach their maximum acoustic output, which is usually significantly less than the RMS, or peak, rating. The factors that determine the speaker’s actual power requirements primarily include the design of the drivers and their enclosure.
The primary value of a speaker’s power ratings is to match the speakers with an amplifier. It’s important to realize that the manufacturer measures an amplifier’s RMS power output under relatively forgiving conditions, by applying a resistive dummy load to the amplifier and using a sine wave test tone at a frequency of 1 kilohertz (kHz).
Real speakers and real music are typically more demanding, and thus the amplifier may not be able to deliver its full rated power under normal listening conditions. In addition, very few listeners ever use the full power of their amplifier, because most amp/speaker combinations will be uncomfortably loud if played at full volume. Thus, an amplifier’s actual output will rarely exceed 40 to 50 percent of its RMS rating, so it’s usually safe to use speakers with an RMS rating that is at least half of the amplifier’s RMS rating.
Frequency Response
A speaker’s frequency response is intended to measure the range of frequencies the speaker can reproduce. Sound frequency is measured in cycles per second, or hertz (Hz), such that a higher frequency indicates sound with a higher pitch. The maximum frequency range that humans can hear under ideal circumstances is 20 to 20,000 Hz. Theoretically, a speaker with a frequency response that includes this range would deliver all the sounds a human is capable of hearing.
In practice, the speaker’s ability to reproduce frequencies at roughly the same volume no matter what frequency of sound is playing is sometimes more important than the frequency range itself. A speaker should not change the relative volume of tones on a recording, which can make the playback sound unnatural. For example, the midrange should not be louder than the bass or treble, otherwise voices (which are mostly in the midrange) would sound unnaturally loud compared to most other instruments.
Sound engineers measure a speaker’s ability to reproduce sound accurately by placing it in a room with sound-absorbing fiberglass wedges, and a calibrated microphone placed directly in front of the speaker. The engineer then feeds a tone to the speaker that contains all the frequencies within its response range at equal volume. Another device records the speaker’s output and creates a graph, or plot, indicating the volume of each frequency within the audio range. The plot of a theoretically perfect speaker will be a flat line.
Sensitivity
A speaker’s sensitivity, expressed in decibels (dB) and sometimes in Sound Pressure Level (SPL), is a measure of a speaker’s efficiency in converting electrical power into sound. A speaker with a higher sensitivity will therefore sound louder at a given power level than a speaker with a lower sensitivity. This value must also be accompanied by an impedance value to determine how easy or difficult a speaker is for an amplifier to drive.
The measurement of a speaker’s sensitivity requires the speaker’s output to be measured at a specific distance within a non-reverberant environment while receiving a specific input signal. The standard distance for this test is one meter along the speaker’s reference axis (usually on the tweeter axis, or midway between the tweeter and woofer, or between the tweeter and midrange for a three-way speaker). The strength of the input signal is 2.83 volts RMS. Sometimes a single tone, such as 500 or 1000 Hz, is used, but most test procedures use the average of the speaker’s output over a certain range, such as 300 to 3000 Hz.
Speaker sensitivity allows consumers to easily compare the relative output of speakers, assuming the tests use the same methodology. However, it’s important to realize that sensitivity is only a relative measurement that’s made under carefully controlled conditions. It doesn’t necessarily indicate a speaker’s output in a given room at a given power level, which depends on many other factors. In an actual room, a speaker will usually play several dB louder with the same signal, because reflections from the floor, walls and ceiling reinforce its sound.
Crossover Frequency
Each driver in a speaker should only receive the frequencies that it’s able to handle better than the other drivers, so a speaker designer must determine the range of frequencies that will be sent to each driver. A plot of a driver’s frequency response will show that the signal output drops off on both ends of the driver’s output range. The designer compares the frequency response of two drivers to determine the frequencies at which the output of the drivers overlaps.
The designer will put the crossover point somewhere within this range. The crossover point is the frequency at which the speaker’s crossover circuit separates the signals for the drivers. For example, in a 2-way speaker with a crossover point of 2.5 kHz, frequencies below 2.5 kHz will go to the woofer, and frequencies above 2.5 kHz will go to the tweeter.
The crossover frequencies in a multi-driver speaker are a critical factor in determining the quality of that speaker’s sound. Poorly chosen crossover frequencies are one of the most common reasons that speakers of otherwise high quality don’t sound as good as they should.
Impedance
Electrical impedance is a measure of the extent to which a circuit opposes an alternating current (AC) when a voltage is applied, which is similar to the resistance of a circuit with direct current (DC). For speakers, impedance measures how the passive elements in a circuit impede the flow of electrons at a particular sound frequency. The passive elements in a crossover circuit include resistors, inductors, and capacitors, which are vital in determining a crossover’s behavior.
Resistors are the simplest of these components, so their behavior is the easiest to understand. They create a fixed resistance to the flow of electrons that isn’t affected by signal frequency. Resistors don’t change a signal’s phase, which is the time relationship between voltage and current. Voltage is the electrical pressure pushing the electrons, and current is the rate at which electrons are flowing past a given point in the circuit.
Resistors can be used in a crossover to reduce the signal strength of all frequencies in a single driver; they’re most often used to balance the sound from the tweeter with the sound from the woofer.
A capacitor impedes the flow of electrons in a way that is dependent upon frequency.
A capacitor’s impedance is inversely proportional to signal frequency, so doubling the frequency reduces the impedance by half. Conversely, halving the signal frequency in capacitor doubles the impedance. This characteristic is useful for creating circuits that are frequency selective, such as crossovers. A capacitor can be used as a simple high-pass filter in a crossover, meaning that it reduces the signal strength below a given frequency.
An inductor, commonly known as a choke or coil, is also an essential element of crossovers. This component functions in the opposite manner of a capacitor because it increases impedance in direct proportion to signal frequency. For example, doubling the signal frequency in a circuit with an inductor doubles the impedance, while having the signal frequency also reduces impedance by half. Inductors can be used as simple low-pass filters, meaning they reduce signal strength above a given frequency.
Each speaker driver has inductance, capacitance and resistance of its own, too. The combination of the drivers’ impedance with the crossover impedance determines a speaker’s total impedance.
Powered vs Passive Speakers
Speakers may be classified into passive and powered types. Each type has advantages that make them more suitable for particular applications.
Passive Speakers
Passive speakers don’t have an internal amplifier to increase the input signal’s strength. They only have passive components—specifically the crossover, which splits the signal according to frequency and direct those signals to a particular driver.
A passive speaker therefore requires its input signal to come from an amplifier, which may be part of a receiver or a separate unit.
Active Speakers
A powered speaker contains its own amplifier, so it needs to be plugged into an electrical outlet in addition to receiving an input signal from an unamplified source. Setting up a powered speaker can be easier, since it doesn’t require an external amplifier. Powered speaker systems are most useful when compactness or portability is critical.
Powered speakers are most commonly found in portable speakers and desktop audio systems used with computers, but they are increasingly popular in larger stereo systems, simple turntable setups, and as stand-alone music systems with Bluetooth connectivity.
Tradeoffs
The presence of an internal amplifier presents advantages and disadvantages in a home theater system. Many consumers assemble their systems piecemeal from components they already have. In these cases, the consumer may need to match a new amplifier with passive speakers they already have or vice versa. A system with passive speakers also allows the consumer to upgrade either component separately.
In a system with active speakers, the amplifier and speaker are combined, so neither can be upgraded in the future. On the other hand, the amplifier in an active speaker is usually well matched to the drivers in the speaker.
Amplifier manufacturers have no way of knowing which speakers will be used with their products, so they need to overbuild their amps to ensure they can accommodate a wide range of speakers. Separate amplifiers are generally more expensive and consume more power than an amplifier in an active speaker, all other factors being equal.
In addition, powered speakers may incorporate digital signal processors (DSPs) that optimize the sound with greater precision than passive crossovers can, and also let the manufacturer add extra features, such as tone controls.
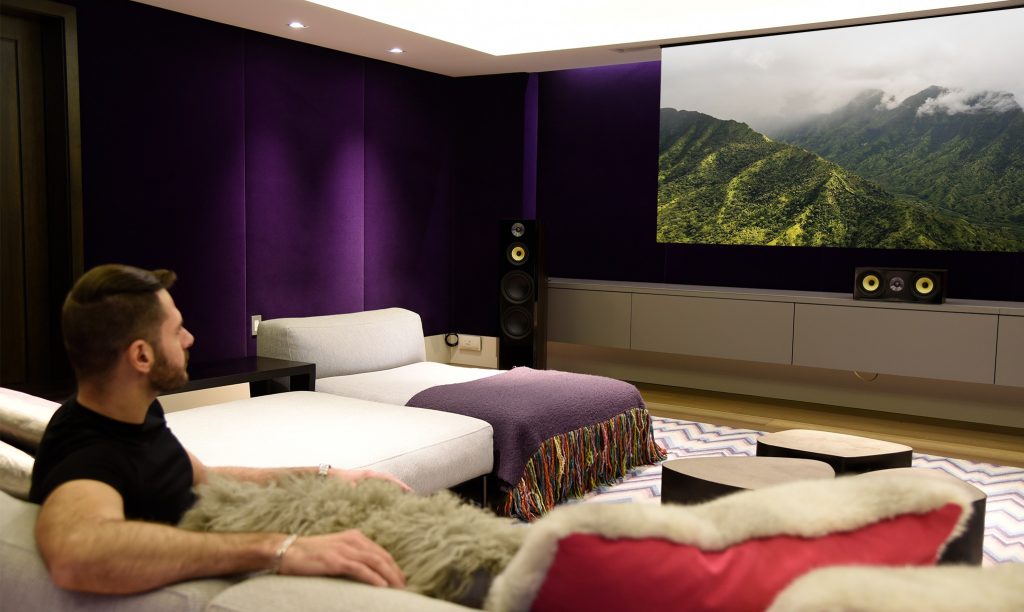
The placement of speakers has a great effect on the sound you hear from your home theater system. This process becomes more complex with surround sound, where multiple speakers are playing sound from five or more channels simultaneously. The general objective of speaker placement is to come as close as possible to the listening experience intended by the makers of the film or music.
In practice, this process involves a lot of compromise, because most people don’t have a listening room dedicated to that activity. A home theater system is usually installed in a living room or den that serves many other purposes for multiple members of the household. Furthermore, home theater users often buy speakers piecemeal, rather than as a single system. Fortunately, many receivers today have an automatic speaker EQ (equalization) function that compensates for less-than-perfect speaker placement.
This section on speaker placement should serve as a general guide, rather than a step-by-step set of instructions. It’s especially important to remember that perfect speaker placement is never possible, due to the subjective nature of individual preferences and the unique configuration of each room. Experimentation will always be necessary to get the best possible performance from your home theater system.
A modern speaker cabinet typically contains more than one individual speaker, or driver, since a driver’s design is largely determined by the frequency range of the sounds it produces. Drivers are traditionally classified as woofers, midranges or tweeters, depending on their frequency range within the standard human hearing range of 20 hertz (Hz) to 20 kilohertz (kHz).
A typical woofer plays sounds in the range of 40 to 3,000 Hz. A midrange driver generally plays sounds between 250 and 4,000 Hz. A tweeter typically plays sounds above 2,000 Hz. Some systems or speakers add a subwoofer, which usually plays from about 20 to 120 Hz. The points at which these drivers overlap depend on the design of the speaker. For example, in a two-way speaker, a woofer probably has to play up to about 2,000 to 2,500 Hz, but in a three-way speaker, the woofer probably plays only up to about 400 or 500 Hz.
The term “toe-in” refers to the extent to which a speaker is pointed directly towards the ideal listening position. A speaker that isn’t toed-in at all will be pointed straight ahead, directly away from the nearest wall. In the case of a typical home theater configuration, speakers with no toe-in will be pointed at a 15- to 30-degree angle away from the listener.
Sound becomes more directional as its frequency increases, meaning that high-frequency sounds drop off more quickly than low-frequency sounds as the speaker’s toe-in decreases.
Furthermore, the level of direct sounds decreases in comparison to reflected sounds as the speaker’s toe-in decreases. Psychoacoustically, reducing toe-in increases the width of the soundstage, but it also tends to reduce the treble response and make the sound a little less vivid.
The front speakers should be placed on opposite sides of the screen, with both speakers aligned on a plane parallel with the screen. The standard home theater configuration calls for the front speakers and viewer to form an equilateral triangle, with a speaker or viewer at each of the triangle’s three vertices. The distance from the listener to the front speakers in this standard configuration will be about 1.15 times the distance between the listener and screen.
This configuration generally works well, but depending on the shape of the room, it may not be practical. In a longer room, placing the viewer’s seat so close to the speakers may leave too much empty space behind the seat. Fortunately, there’s no hard-and-fast rule here. The big difference you get by moving the listening position further from the speakers (or moving the speakers closer together) is that the stereo image between the speakers will be more focused, but the sound will be less spacious. In a home theater system, where the center speaker provides a focused center image and the surround speakers provide the ambience, the speaker-to-listener distance isn’t as critical.
The ideal listening position in a deep room will be slightly behind or ahead of the front-to-back center of the room, which helps avoid resonances. These resonances (often called room modes) can occur when the length of the room is an even multiple of the wavelength of a sound, causing any parallel walls (or the floor and ceiling) to repeatedly reflect standing sound waves between them. This affects mostly the bass frequencies, below about 200 Hz—it will make some bass notes sound too loud, while others will be muted. The problem is usually worst when the listener is in the center of a room, which is why it’s best to have the listener a little behind or ahead of the front-to-back center of the room.
The listener and speakers should, if possible, be centered side-to-side in the room, because this position will deliver the best stereo imaging. The biggest concern with a shallow room is that the front speakers will be too close to the listener to create adequate stereo separation. For these rooms, it may be necessary to move the listening position closer to the rear wall. However, the closer the listener is to the rear wall, the more the bass frequencies will be emphasized—which may be a good thing or a bad thing, depending on taste.
The height and angle of the front speakers is one of the most critical aspects of setting up a home theater system. In a surround sound system, the front speakers will be the only ones in operation when listening to two-channel sources such as CDs and digital audio streams.
For films, the left and right front channels are typically used for the music score and sound effects, making the height and angle of these speakers particularly important for creating the desired stereo image.
The most important consideration in the height of the front speakers is that the tweeters should be level with the listener’s ear, due to the highly directional nature of high-frequency sounds. These speakers should typically be about 30 degrees to the left and right of center for a typical room. It may be necessary to point the front speakers slightly away from the listener by as much as eight degrees. Experiment with the angle to find the position that appears to give sounds the most distinct position in space.
The center speaker channel in a surround sound system is primarily used for on-screen dialogue, so it generally needs to be located close to the screen.
It probably won’t matter if it’s directly above or below the screen, so long as it’s as close to the center line between the viewer and screen as possible.
Center speakers may be angled slightly upward if they are more than a foot or so below the listener’s head, or slightly downward if they are above the listener’s head.
The left and right rear speakers in a surround sound system are primarily used to play behind-the-listener effects, ambiance and room sounds. Crowd noise is also recorded on these channels for sporting events to create the sensation of being in the stadium. Depending on the size and shape of the room and the positioning of the seating, these speakers are often placed closer to the listener than the left and right front speakers.
These speakers can be at the same height as the front speakers, but they may need to be slightly higher to ensure the sounds clear the back of the listener’s chair or couch, and placing them higher can also create a greater sense of natural ambience. Ideally, the left and right rear speakers should be placed at 120 degrees from the listener’s center line, slightly behind the listener.
Traditional speakers are of a monopole design, meaning all of the drivers project sound in the same direction. The drivers in bipole speakers face in opposite directions, and are wired together in phase, so their sounds complement each other and don’t cancel each other out. The drivers in dipole speakers operate out-of-phase above a certain frequency, cancelling each other to create a “null” to the side of the speaker.
When bipole and dipole speakers are used for the front channels in a home theater or stereo system, they must be placed at a reasonable distance from the wall behind them, typically 1 foot more. This gives the rear-facing part of the speaker “room to breathe,” and allows the sounds it emits to reflect off the wall behind the speaker, increasing the sense of space.
Because of their spacious sound, bipole and dipole speakers are often used in the rear/side channels of surround sound systems, mounted so that their drivers fire forward and backward, not directly at the listener. Because dipole surround speakers create such a big, ambient sound, they are good for getting theater-like sound in a small room. Bipole speakers strike a “middle ground”: They produce sound that’s more focused than a dipole, but more spacious than a monopole, which makes them better suited for surround sound music than a dipole.
Bipole and dipole surround speakers are usually mounted directly on a wall, or placed on a stand against a wall. They should be placed directly to the sides of the listener, with the drivers firing forward and backward instead of directly at the listener. Dipole surround speakers have a directional arrow which shows which end of the speaker should be pointed forward.
Most speakers sound best when placed some distance away from the wall behind them. Keeping the speakers a certain distance from the wall has two positive effects. First, it tends to make the sound more spacious and realistic. Second, it keeps the bass from getting too boomy, because the closer the speaker is to a wall, the more its bass will be reinforced.
The general rule is that directional speakers such as traditional box speakers should be placed least 1.5 feet from a wall. However, it may be necessary to move them two to three feet away from the wall to obtain clean bass, depending on the size of the speakers and the room. Some smaller speakers may benefit from being closer to the wall, because it’ll boost their bass. Often, it’s a trade-off: The closer the speaker is to the wall, the more bass you’ll get, but the less spacious the sound will be.
Multi-directional speakers such as bipole speakers and dipole speakers project sound forward and directly toward the wall behind them so you may want to place them further away in order to best take advantage of the extra spaciousness these speakers provide. Again, it’ll be a trade-off: Moving them further away may make the sound more spacious, but might make the bass notes sound too weak.
Speaker stands are typically used with so-called “bookshelf” speakers that are too short to be placed directly on the floor. The stands should be of a height that allows a speaker’s tweeter to sit at about the same height off the floor as a seated listener’s ears. Stands are often used for small surround speakers, too. They should be at least tall enough so the speaker’s tweeter is at ear level for a seated listener; if a more spacious surround sound effect is desired, taller stands can be used.
Wall-mounted speakers are specifically designed to be installed directly against a wall. These speakers are most often used when floor space is unavailable. They’re also used as an alternative to an in-wall speaker; unlike an in-wall speaker, wall-mounted speakers don’t require holes to be cut in the wall.
The low frequencies of a subwoofer are omnidirectional, providing users with greater flexibility in their placement. The driver doesn’t need to face the listener, and the subwoofer’s distance to the listener is rarely a critical factor. What does affect a subwoofer’s sound is its distance to solid surfaces, especially walls. Placing a subwoofer closer to the wall behind it will reinforce its bass, although it might also make the bass too boomy. This effect is even more extreme if the subwoofer is placed in a corner.
The easiest way to find the best placement for a single subwoofer is to do the “subwoofer crawl.” To do this, put the subwoofer in the primary listening chair, then play some music that has a melodic bass line with notes of widely varying pitch. Now crawl slowly around the front of the room with your head about a foot off the floor, and find the place where the bass notes sound the most even. That’s the best place for the subwoofer.
A single subwoofer is usually adequate for an average-sized room in a house. However, a single subwoofer is more prone to creating the resonances, or room modes, discussed above. These modes will make certain bass notes sound louder than others, and their effects will vary as you move around the room. Using two or four subwoofers helps to cancel the effects of these modes and smooth out the bass response, to create a more consistent listening experience for everyone. A second subwoofer can also provide a home theater system with more bass output. Because adding a second subwoofer takes some of the load off the first subwoofer, the bass will probably sound cleaner and less distorted.
The room’s layout will help determine the best location for two subwoofers. Some rooms will get better results by placing the subwoofers in adjacent corners, while other rooms will sound better with the subwoofers at opposite ends of the room. This determination often requires some experimentation with different locations to get the basic best bass response.
Thicker wire allows electrons to move more freely, so it has a lower resistance and can carry a greater electrical current. However, thicker wire is also heavier. All of these factors are important considerations for a home theater system.
Wire thickness is measured according to a gauge system, of which several such systems are in common use today. The most common wire gauge system in the United States is the American Wire Gauge (AWG). A The higher the AWG number, the thinner the wire.
Home theater systems commonly use stranded 12 to 18 AWG wire. Anything with a higher gauge than 18 will add unnecessary resistance to the wire; not only does this present a risk of the wire getting too hot, it can also change the sound of the speaker.
The choice of materials in electrical wiring is primarily based on cost and electrical conductivity. Electrical resistivity is a measure of resistance and distance, so its official unit of measure is ohm⋅meters (Ω⋅m). Electrical conductivity is the inverse of resistivity, so it’s measured in inverse ohms per meter. An inverse ohm is formally known as a Siemens, so the official unit of measure for electrical conductivity is Simens per meter (S/m). The four most electrically conductive elements are as follows:
Name Conductivity (S/m)
- Silver 6.30×10⁷
- Copper 5.96×10⁷
- Gold 4.10×10⁷
- Aluminum 3.77×10⁷
These values show why copper is by far the most popular choice for electrical wiring. It’s only slightly less conductive than silver, but much less expensive. Aluminum is cheaper than copper, but also significantly less conductive. However, corrosion is another factor to consider when designing a home theater system. Different metals can corrode when they’re in contact with each other because ions from the two metals exchange places over time, a process known as galvanic corrosion. Copper is especially prone to this type of corrosion, whereas gold is highly resistant to corrosion. Electrical contacts in high-end components are often made of gold alloys for this reason.
The requirements for electrical wiring are highly dependent on whether the wiring will be used outside or inside the wall. If the wiring will be outside the wall, you will generally be concerned with just ensuring that the wire is thick enough for the current it will need to carry.
Electrical equipment such as the components in a home theater system will usually provide specific guidance on this topic, although the great majority of the wiring for sound systems is between 12 and 18 AWG. Most commercial electrical wiring for outside-wall applications will be acceptable for sound systems, provided it is of appropriate thickness and has undamaged insulation.
The issue of wiring becomes more complex with in-wall installations because the wiring must comply with local building codes. In general, in-wall speaker wire must be at least Class 2 (CL2) or Class 3 (CL3), as rated by the National Electrical Code (NEC). These classifications indicate the wiring complies with Underwriters Laboratory (UL) standards, which determines the wiring’s suitability for use in applications described by the NEC. CL2 and CL3 wiring is suitable for general use in both signaling and power applications, including most home theater systems.
These classifications primarily indicate the ability of the wiring to resist heat damage. CL2 can handle up to 150 volts, while CL3 can handle up to 300 volts. The NEC also adds suffixes to these base classifications to describe more specific uses of electrical wiring. CLP wiring is rated for use in plenum spaces such as ventilation spaces, so the insulation can’t produce harmful gases when it burns. CLR wiring is for riser applications where the wiring passes between floors, so its fire requirements are less strict than CLP wiring.
Wiring designed for in-wall applications is also identified by the AWG and the number of electrically isolated conductors within the outer cable. The format for this identification is x/y, where x is the wire gauge and y is the number of conductors. For example, 16/2 wiring uses 16 AWG wire and has 2 conductors.
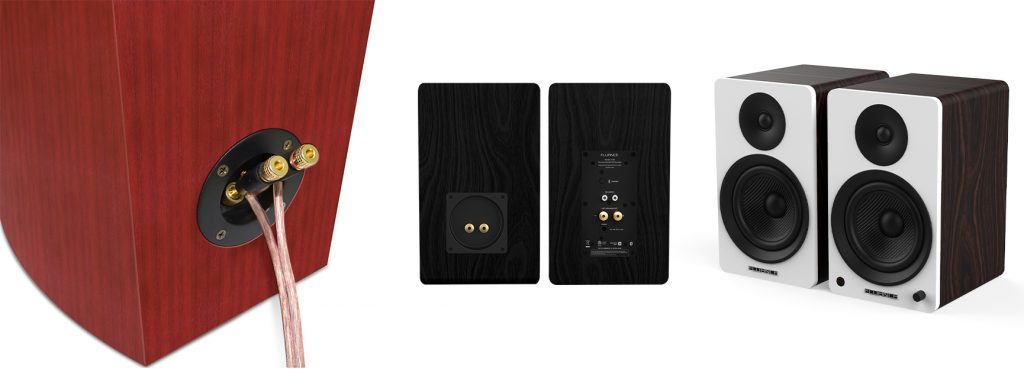
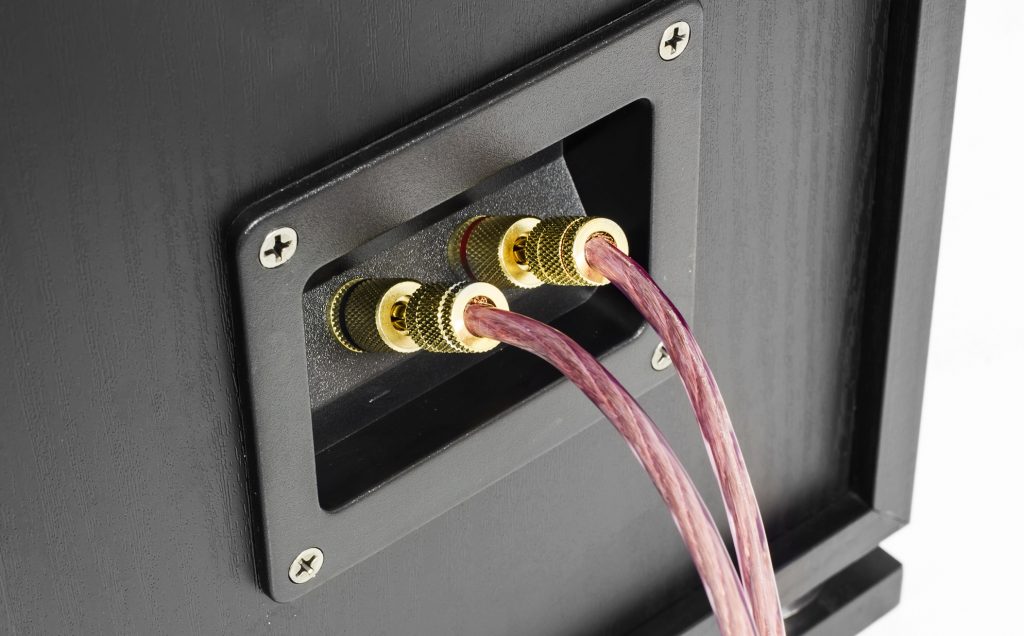
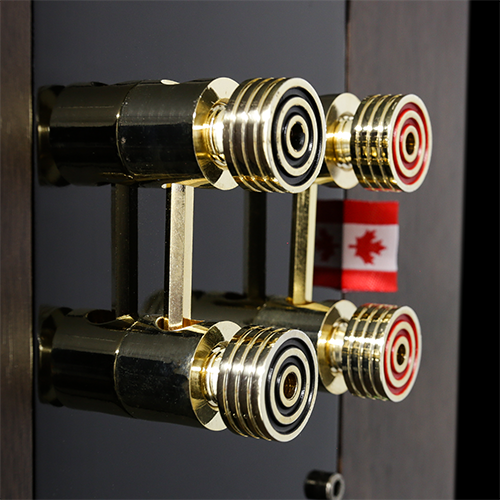
Wiring must be attached to audio equipment via some type of terminal. The most common types of terminals include spring clips and binding posts.
Spring clips consists of a pair of holes with some type of spring-loaded clip holding the wires in place. Release the clip by manipulating the clip, usually by pressing down. Insert the bare ends of a conductor into a hole, and release the clip to hold the conductor in place. Spring clips are more common on older equipment, especially vintage receivers.
Binding posts consist of a threaded metal post with a screw cap. Wrap the bare wire around the post and screw the cap down to secure the wiring in place. Binding posts can also be used to connect wiring with spade lug (forked) terminals, provided the plastic collar surrounding the binding post has enough space to fit the spade lug, and they will also work with pin-type terminals and banana plugs (discussed below). Most modern sound systems use binding posts due to their greater security.
An audio device is normally connected to a speaker via a single pair of wires feeding the crossover circuit, which then feeds the different drivers. Bi-wiring involves using a separate pair of wires to connect to each driver in the speaker. For bi-wiring to work, the speaker must have separate terminals for each set of wires.
A two-way bi-wireable speaker has separate terminals for the woofer and tweeter, while a three-way bi-wireable speaker could have separate terminals for the woofer with the midrange and tweeter sharing one set of terminals, or it could have separate terminals for the tweeter with the woofer and midrange sharing a set of terminals. This technique is distinct from bi-amping, in which a separate amplifier is used for each driver.
The purported advantage of bi-wiring is to reduce the magnetic interaction between the different drivers in the speaker, creating better sound. Some audiophiles feel this technique results in small but important improvements, especially in the precision of the bass response and smoothness of the treble.
Critics of bi-wiring assert that bi-wiring is electrically equivalent to the traditional method of connecting speakers, provided there is no difference in the electrical resistance of the cables. Technical analysis suggest that bi-wiring does produce differences in the electrical signal reaching the drivers, but these differences are too small to be meaningful.
The primary advantage of in-wall wiring is to keep the wires out of the way. In-wall installation is much easier to perform before the home’s construction is complete, although the drywall may already be up.
A homeowner may be able to prepare a home for an in-wall installation of a home theater system before the drywall is up, typically for a home that’s still under construction or one that’s undergoing a major renovation. This approach may also include a homeowner running wires in a part of the house that doesn’t have drywall, such an attic, basement or unfinished crawlspace.
The biggest advantage of installing the wiring before hanging the drywall is that it allows the drywall installer to cut custom holes for wiring and speaker brackets in the drywall, and it’s much easier than having to “fish” the wire through finished walls.
It’s also possible to install in-wall wiring after the drywall wall is up but before the interior walls are finished. An experienced DIYer can do most of the real work with a drywall saw and auger, but it’s important to use only tools that are specifically designed to cut through the soft drywall without tearing. Once the holes are cut, it’s a relatively simple matter to mount speakers and route wiring.
The biggest challenge is avoiding the cross braces, which should be halfway between the floor and ceiling. The exact location of the cross braces can vary because they need to be staggered by an inch or two to provide the vertical studs with greater strength.
An in-wall installation of a home theater system often includes a wall plate that provides dedicated connections for each speaker in the system. The wiring inside the wall connects the wall plate to the receiver, eliminating the need to run wire from each speaker directly to the receiver.
The wall plate that’s included with the system is specifically designed for a particular version of surround sound, although universal wall plates are also available for any type of in-wall wiring. A wall plate requires some type of bracket to attach it to the drywall. A bracket made for a finished wall clamps itself to the mounting hole, while a bracket for an unfinished wall can be nailed directly to a stud.
A receiver is frequently connected to speakers with a banana plug. This single-wire connector consists of a metal pin with a length of spring metal attached to each end of the pin. They’re commonly used in many types of electrical equipment, including home theater systems. The dimensions of banana plugs aren’t well standardized, and many countries use their own version of banana plugs. For example, the most common size in the United States is a diameter of four millimeters (mm) and a length of 15 mm.
The specific method of connection is also variable, but it generally relies on the use of spring metal to apply an outward force to a cylindrical jack. This design creates a good electrical connection by simply inserting the banana plug into a jack.
Installing a home theater system requires you to determine what you want now and what you may want in the future. The most common upgrade is increasing the number of speakers in the system, which requires a receiver that can provide the extra channels. However, it’s best not to plan too far ahead when attempting to future-proof your system. It may not be worth spending top-dollar to get all the very latest features, because you may not end up using many of them, and next year there will be yet another new receiver with more new features. Get what you need, and bear in mind that the price of electronics is continually dropping and new models are always being released.
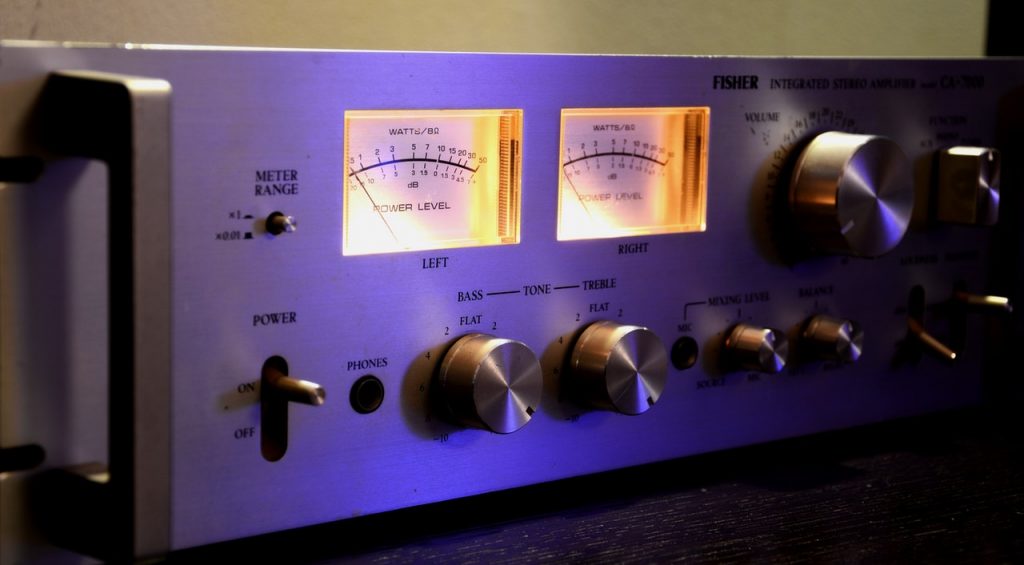
A receiver or surround processor is the nerve center of any audio/visual (AV) system because it provides connections for most or all of the other components. A receiver will have amplifiers built in. With a surround processor, you have to add a separate amplifier or amplifiers. Most of today’s receivers and surround processors offer advanced features such as automatic equalization that tunes the sound of the system to suit the acoustics of the room.
The most obvious factor to consider when buying a receiver is ensuring that it provides a sufficient amount of clean power to drive the speakers. However, even low-end models typically meet this requirement today, so a purchase decision is more likely to center on other factors such as connectivity and A/V management options.
Receivers may be classified into stereo and A/V types, the primary difference being that A/V receivers can route video signals and include surround-sound decoding, as well as the extra amplifiers needed for the extra surround channels. It might seem that a stereo receiver is a low-end option, but many audiophiles prefer them for their simplicity.
An A/V receiver is essential for a home theater system. Today’s A/V receivers include at least 5 channels of amplification (for front left, center, and right plus two surround speakers) as well as a line output for a powered subwoofer. A/V receivers also have many other features that are rarely found on stereo receivers.
One of the most critical steps in selecting a receiver is ensuring that it has enough power to drive your speakers. Most receivers have enough power to drive most speakers to a loud level. As long as your speakers have a sensitivity rating of at least 84 dB or so, a receiver with 80 to 100 watts per channel into 8 ohms should be powerful enough.
Note that some manufacturers publish power ratings in ways that make their receivers look more powerful. Some will do this by showing rated power with a 1 kHz signal, instead of from 20 Hz to 20 kHz. Some will measure the power with just one channel active, instead of all five or seven channels. Some will publish a power spec into 6 ohms instead of 8 ohms. Some rate power at 1% total harmonic distortion (or THD), while others hew to a more demanding standard of 0.5% or 0.1%. When you compare receivers, be aware of these tactics, and if the manufacturer uses them, count on that receiver actually delivering somewhere between 50 and 75 percent of its published power rating.
If some or all of your speakers have an impedance of 4 ohms, you need to choose a receiver that’s rated to handle 4-ohm loads. If a speaker has a published power rating into 4 ohms, it should be able to drive 4-ohm speakers safely.
The more speakers a receiver can drive, the more it’s likely to cost. While it may be tempting to get a receiver that handles the largest number of channels, there’s no point in buying a receiver unless you plan on actually installing speakers for all of those channels.
An A/V receiver will have at least 5.1 channels – five amplifiers plus a line output for a subwoofer – and most now have at least 7.1 channels. The very latest Dolby Atmos-compatible receivers offer 13.2 channels of sound – 13 speakers plus connections for two subwoofers. Most of the sources that connect to an A/V receiver – Blu-ray Disc players, satellite receivers, cable boxes, video streaming boxes, gaming consoles, etc. – will connect through HDMI cables, so make sure the receiver you choose has enough HDMI inputs for all your devices plus a couple to spare.
Although analog video sources such as VCRs are no longer common, most receivers will have a couple of composite and component video inputs to accommodate these, with accompanying analog and digital audio inputs. They’ll also offer at least a couple of analog inputs for devices such as cassette decks and MP3 players, and many include an input for a turntable. Make sure any receiver you consider has all the inputs you need.
Receivers can be classified into entry-level, mid-level and high-end models, based on the minimum features you can expect of each category. This information can change quickly as prices drop and new features are added.
Entry-level receivers are available for less than $300 and should have 5.1-channel surround sound with decoding for Dolby TrueHD and DTS-HD Master formats. Some receivers in this price range may have 7.1-channel formats. The power rating of these receivers will typically be between 50 and 100 watts.
The connections they offer will be limited—usually three or four HDMI inputs plus a couple of analog audio/video inputs—so if you buy a receiver in this price range, be sure that it has enough inputs for all your sources. Many also include Bluetooth wireless, and some include a home network connection that allows them to be used in a multiroom audio system, or to stream music from the Internet.
A mid-level receiver costs between $300 and $600. At a minimum, they’ll offer Dolby TrueHD and DTS-HD Master Audio. Toward the top of the range you’ll also find receivers with Dolby Atmos and DTS:X, the new “immersive” audio formats that let you add height speakers (either ceiling speakers or speakers that bounce sound off the ceiling) for increased ambience. However, receivers in this price range probably won’t include enough amplification channels for the height speakers, so you may have to add an extra amplifier to power those.
More reliable power ratings are a common characteristic of mid-level receivers, primarily due to components of better quality, and many of these receivers put out more than 100 watts per channel. Mid-level receivers also have more inputs and more likely to offer inputs on the front panel, and most have some sort of automatic room equalizer function that optimizes the sound of your speakers to suit the acoustics of your room. Expect these receivers to include Bluetooth and some sort of network audio and streaming technology, such as Apple AirPlay or Google Chromecast.
High-end receivers cost more than $600, and should provide accurate power ratings with very low THD. Most put out 120 watts or more per channel. They include Dolby Atmos and DTS:X, with as many as 13 channels of amplification to power the extra speakers. Multiroom amplification and speaker switching are also common features in this price range. They’ll include networked audio and digital streaming technology, as well as more advanced versions of the automatic room EQ technology built into midpriced receivers. They’ll offer an even wider selection of inputs, plus line outputs for all channels that let you add additional amplifiers for more power.
Room Treatment
You probably already know where your home theater system will be installed. Some home owners may have a choice of rooms, but the majority of homes have only one room that’s a strong candidate for this use. Ideally, this room is dedicated to its task, with picture and sound quality as top priorities, but in practice, the home theater room will also serve other functions. These restrictions mean that a room often requires additional treatment to obtain the best possible experience.
The room should not be perfectly square. If the walls are all the same distance apart, it will create powerful bass resonances at certain frequencies, which will make the bass extremely uneven in the room. A rectangular room will spread these resonances more evenly across the audio band, thus weakening them and reducing their negative effects. For home theater, it’s generally best to have some absorptive material behind the speakers, and on the side walls between the listener and the speakers.
Many companies make foam or fiberglass sound absorbing panels specifically for this purpose. The thicker the panel, the lower the frequencies of sound it will absorb. Foam or fiberglass panels that are 4 inches thick are a good choice. If it’s not aesthetically desirable to use these panels, thick drapes are a good substitute, and plush furniture also helps. For stereo systems, less absorption may be desirable because the absorption tends to reduce the spaciousness of the sound.
Parallel walls in a listening room create “flutter echo,” or sounds bouncing back and forth between the walls. For this reason, it’s a good idea to add paintings, shelves, etc., to large, empty flat wall spaces. These objects will help diffuse the sound and create a greater sense of spaciousness.
Drapes will also help prevent sunlight from washing out the display screen or creating glare. It may be necessary to use black-out shades over the windows when sunlight is a particular problem. Close drapes completely before using the display screen.
Speaker Size
Speakers must be suitable for the room. Home theater owners are usually more concerned with ensuring their speakers are big enough for the room, but most large tower speakers are designed to be used at a distance of 12 feet or more from the listener. Their drivers are often spaced far apart, and their sound waves won’t combine properly at closer distances. They may also produce far more bass than a small room needs.
On the other hand, speakers that are too small may not be able to adequately fill a large room. To fill a large room, they may have to play louder than their designers intended, which will not only increase distortion and reduce the clarity of the sound, but it’ll also shorten the lifetime of your speakers, since they will often be driven past their limits.
Speaker Location
Speaker location is one of the most effective ways of getting the best sound from your room. In particular, you generally need to avoid the temptation to place the speakers directly against the wall. While this location may keep them out of the way, it will also reinforce the bass, often to the point where the sound becomes muddled.
Full-range speakers typically should be two to three feet from the nearest wall. It’s especially important to avoid placing speakers in a corner, unless they are small and need a great deal of bass reinforcement. You should also pull the couch away from the wall, because the bass will likely be excessively loud and boomy when you’re close to the wall.
While tempting for the sake working with your existing furniture, you shouldn’t place speakers inside any type of enclosure such as cabinets. Furthermore, the space between the speakers and listeners should be unobstructed. Make sure there are no pieces of furniture between the listener and the speakers, and that no décor is placed in front of the speakers.
Room Shape
Rooms are generally rectangular, but newer homes often have rooms with more irregular shapes, such as “L” shapes, vaulted ceilings, etc. These rooms don’t necessarily sound bad; indeed, their irregular shape can reduce bass resonances. However, they sometimes make it more difficult to find a place to mount the surround speakers—there might be an open space right in the place that would be ideal for a surround speaker. In this case, you have to get the speaker as close as possible to the ideal location, then balance out its sound using the receiver’s channel level controls and/or automatic equalization function.
The most common location for the display screen in a home theater system is against a wall, usually in the center. A particularly small room may require you to make more efficient use of your available space by placing the screen in the corner. You can still set up a home theater this way, but you’ll be compromising the sound somewhat, as speakers are generally designed for use in rectangular rooms.
Speaker Configuration
Surround sound systems are identified by the numbering scheme x.y, where x is the number of full-range channels and y is the number of low-frequency effects (LFE) channels. The full-range channels can cover frequencies from 20 to 20,000 Hz. However, the speakers used for these channels often can’t cover this entire range, so the receiver or surround processor may route the bass from these channels into the subwoofer. The LFE channels contain only sounds below 120 Hz, which should be played only by a subwoofer. Sounds in this frequency range are often used in action movies for large impacts and explosions.
You’ll often see the surround sound numbers on a variety of products, including home theater systems, receivers and DVD/Blu-ray discs. While these numbers refer directly to the number of channels, it’s often more helpful to think of it in terms of speakers. Thus, a 5.1 recording can support a maximum of 5 regular speakers and one subwoofer. More advanced home theaters use 7.2 channels, adding two extra surround speakers, and many now add ceiling speakers for use with the new Dolby Atmos and DTS:X formats; the latest receivers now handle 13.2 channels, and some surround processors can handle even more.
A 2.0 system includes only a left and right channel. This is the traditional stereo system used for playback of vinyl records, CDs, and digital downloads and streaming. Most audiophiles prefer a 2.0 system because its simple and it’s what most music is mixed for. A 2.1 system adds a subwoofer to this configuration, which usually gives you more bass and also allows the level of the bass to be adjusted relative to the midrange and treble. A 2.1 system can deliver powerful bass while using small, decor-friendly speakers for the left and right channels.
A 3.1 consists of a left, right and center channel with a subwoofer. The addition of the center speaker makes dialogue appear to come from the video screen, no matter where the listener is seated. The system would typically be used in a room where surround sound speakers would be in the way or appear out of place.
A 5.x configuration includes front left, right and center speakers plus two surround speakers in the rear or sides. A 5.0 system uses large tower speakers for the front left and right channels; these speakers should be able to produce enough bass on their own without the addition of a subwoofer.
A 5.1 configuration adds a subwoofer to the 5.0 surround sound system. This is the most common configuration for home theaters. The ideal angle for the left and right front speakers should be 22 to 30 degrees from the center axis between the listener and display screen. The best position for the rear speakers is usually 90 to 110 degrees from the center axis.
A 5.2 configuration adds a second subwoofer. The second subwoofer may be added to increase the amount of bass, or to produce smoother bass response for multiple listeners. This is most likely to be necessary in large open rooms or rooms with unusual shapes.
A 6.x configuration adds a center speaker behind the listener. The channel for this speaker is most often used in films for behind-listener effects. These systems were common in the early ’00s but have been largely replace by 7.x systems.
A 7.x configuration replaces the single rear center speaker in the 6.x configuration with a left and right rear speakers. This change allows the system to produce behind-listener effects in stereo. The side speakers in a 7.x configuration should be located at 90 to 110 degrees from the center axis, which is the same as the rear speakers in a 5.x configuration. The rear speakers in a 7.x configuration are then moved further to the rear, typically to about 135 to 150 degrees.